ZendService\LiveDocx
Introduction
LiveDocx is a SOAP service that allows developers to generate word processing documents by combining structured textual or image data from PHP with a template, created in a word processor. The resulting document can be saved as a PDF, DOCX, DOC, HTML or RTF file. LiveDocx implements mail-merge in PHP.
The family of ZendService\LiveDocx\LiveDocx components provides a clean and simple interface to LiveDocx Free,
LiveDocx Premium and LiveDocx Fully Licensed, authored by Text Control GmbH, and additionally offers
functionality to improve network performance.
ZendService\LiveDocx\LiveDocx is part of the official Zend Framework family, but has to be downloaded and installed
in addition to the core components of the Zend Framework, as do all other service components. Please refer to
GitHub (ZendServiceLiveDocx) for download and installation instructions.
In addition to this section of the manual, to learn more about ZendService\LiveDocx\LiveDocx and the backend SOAP
service LiveDocx, please take a look at the following resources:
- Shipped demonstration applications. There is a large number of demonstration applications in the
directory
/demos. They illustrate all functionality offered by LiveDocx. Where appropriate this part of the user manual references the demonstration applications at the end of each section. It is highly recommended to read all the code in the/demosdirectory. It is well commented and explains all you need to know about LiveDocx andZendService\LiveDocx\LiveDocx. - LiveDocx in PHP.
- LiveDocx SOAP API documentation.
- LiveDocx WSDL.
- LiveDocx blog and web site.
Sign Up for an Account
Before you can start using LiveDocx, you must first sign up for an account. The account is completely free of charge and you only need to specify a username, password and e-mail address. Your login credentials will be dispatched to the e-mail address you supply, so please type carefully. If, or when, your application gets really popular and you require high performance, or additional features only supplied in the premium service, you can upgrade from the LiveDocx Free to LiveDocx Premium for a minimal monthly charge. For details of the various services, please refer to LiveDocx pricing.
Templates and Documents
LiveDocx differentiates between the following terms: 1) template and 2) document. In order to fully understand the documentation and indeed LiveDocx itself, it is important that any programmer deploying LiveDocx understands the difference.
The term template is used to refer to the input file, created in a word processor, containing formatting and text fields. You can download an example template, stored as a DOCX file. The term document is used to refer to the output file that contains the template file, populated with data - i.e. the finished document. You can download an example document, stored as a PDF file.
Supported File Formats
LiveDocx supports the following file formats:
Template File Formats (input)
Templates can be saved in any of the following file formats:
Document File Formats (output):
The resulting document can be saved in any of the following file formats:
Image File Formats (output):
The resulting document can be saved in any of the following graphical file formats:
ZendService\LiveDocx\MailMerge
MailMerge is the mail-merge object in the ZendService\LiveDocx\LiveDocx family.
Document Generation Process
The document generation process can be simplified with the following equation:
Template + Data = Document
Or expressed by the following diagram:
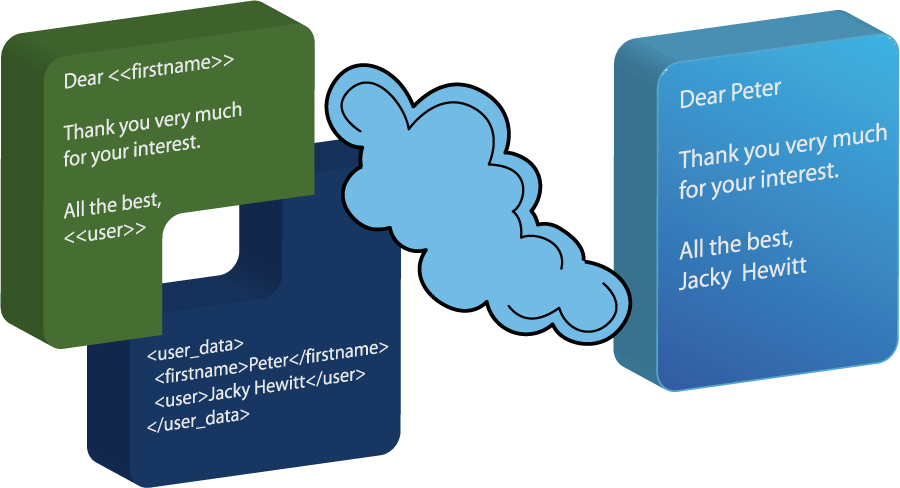
Data is inserted into template to create a document.
A template, created in a word processing application, such as Microsoft Word, is loaded into LiveDocx. Data is then inserted into the template and the resulting document is saved to any supported format.
Creating Templates in Microsoft Word 2007
Start off by launching Microsoft Word and creating a new document. Next, open up the Field dialog box. This looks as follows:

Microsoft Word 2007 Field dialog box.
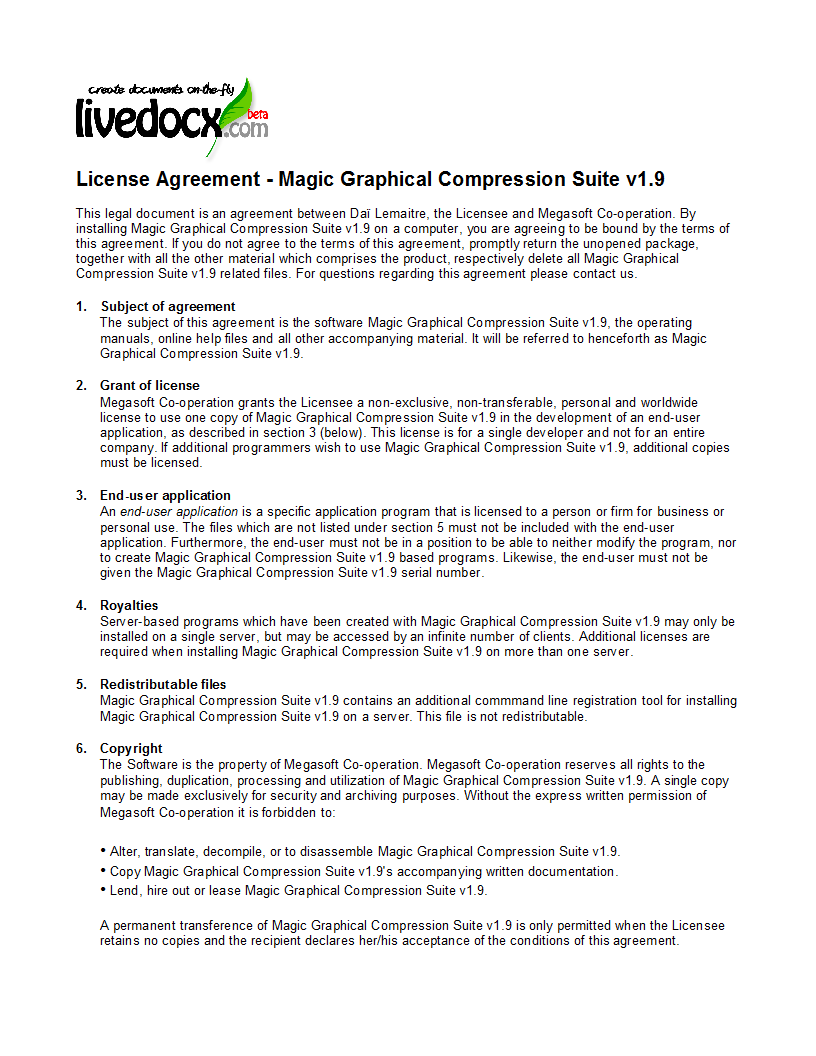
Using this dialog, you can insert the required merge fields into your document. Below is a screenshot of a license
agreement in Microsoft Word 2007. The merge fields are marked as { MERGEFIELD FieldName }:
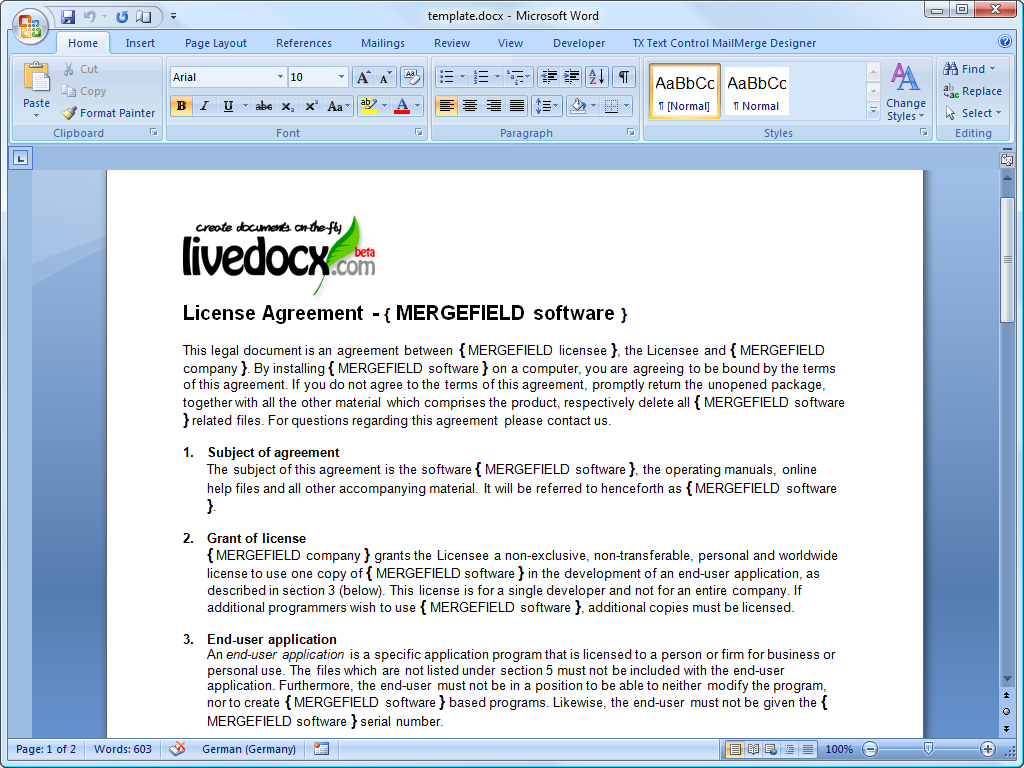
Template in Microsoft Word 2007.
Now, save the template as template.docx.
In the next step, we are going to populate the merge fields with textual data from PHP.

Cropped template in Microsoft Word 2007.
To populate the merge fields in the above cropped screenshot of the template in Microsoft Word, all we have to code is as follows:
1 2 3 4 5 6 7 8 9 10 11 12 13 14 15 16 17 18 19 20 21 22 23 24 25 26 27 28 29 30 31 32 33 34 | use ZendService\LiveDocx\MailMerge;
$locale = Locale::getDefault();
$timestamp = time();
$intlTimeFormatter = new IntlDateFormatter($locale,
IntlDateFormatter::NONE, IntlDateFormatter::SHORT);
$intlDateFormatter = new IntlDateFormatter($locale,
IntlDateFormatter::LONG, IntlDateFormatter::NONE);
$mailMerge = new MailMerge();
$mailMerge->setUsername('myUsername')
->setPassword('myPassword')
->setService (MailMerge::SERVICE_FREE); // for LiveDocx Premium, use MailMerge::SERVICE_PREMIUM
$mailMerge->setLocalTemplate('license-agreement-template.docx');
$mailMerge->assign('software', 'Magic Graphical Compression Suite v1.9')
->assign('licensee', 'Henry Döner-Meyer')
->assign('company', 'Co-Operation')
->assign('date', $intlDateFormatter->format($timestamp))
->assign('time', $intlTimeFormatter->format($timestamp))
->assign('city', 'Lyon')
->assign('country', 'France');
$mailMerge->createDocument();
$document = $mailMerge->retrieveDocument('pdf');
file_put_contents('license-agreement-document.pdf', $document);
unset($mailMerge);
|
The resulting document is written to disk in the file license-agreement-document.pdf. This file can now be post-processed, sent via e-mail or simply displayed, as is illustrated below in Document Viewer 2.26.1 on Ubuntu 9.04:
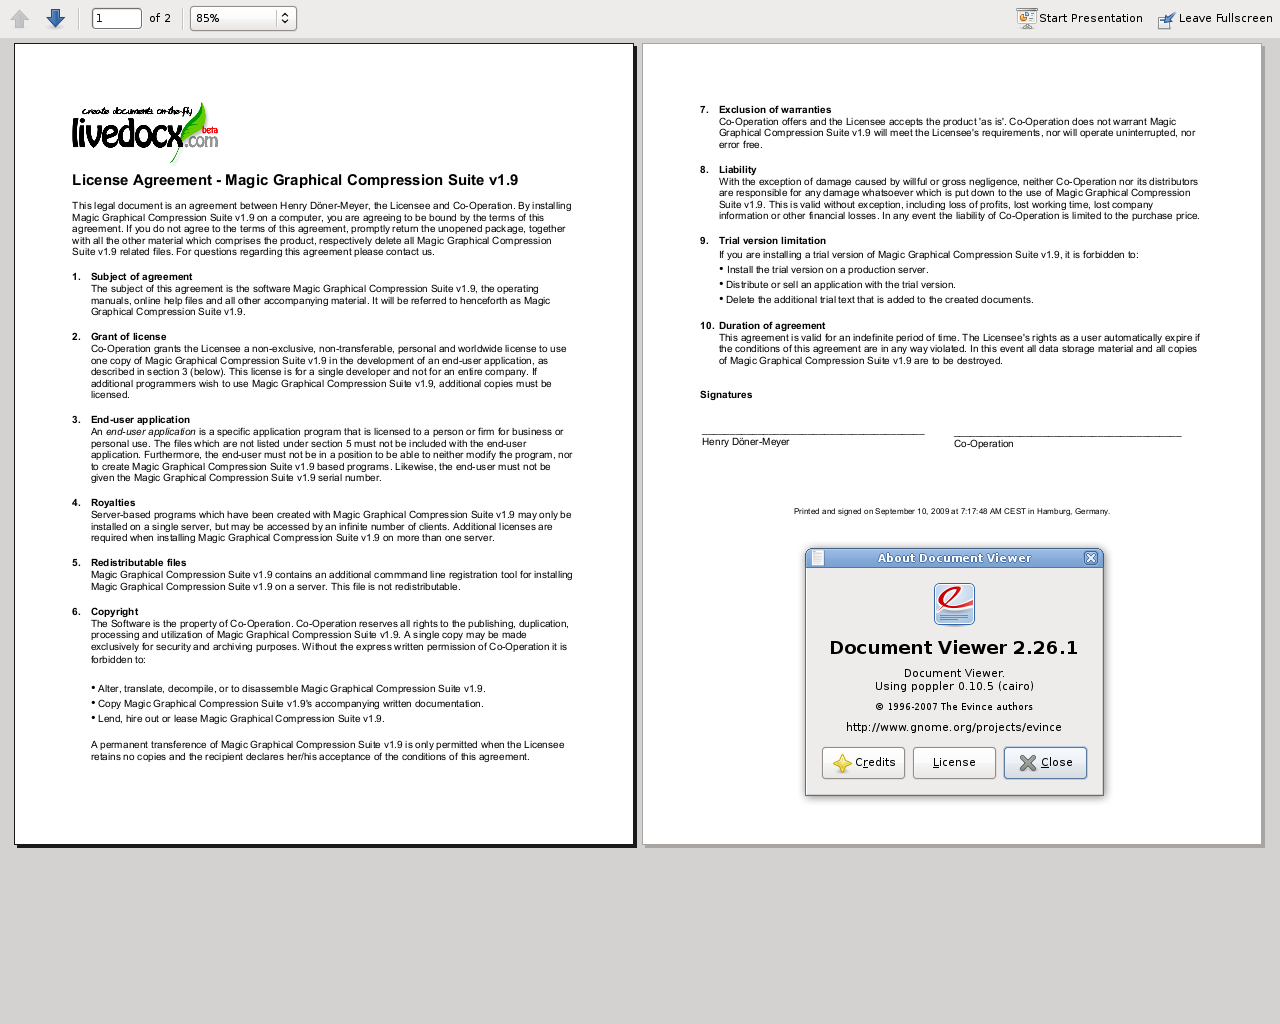
Resulting document as PDF in Document Viewer 2.26.1.
For executable demo applications, which illustrate the above, please take a look at
/demos/ZendService/LiveDocx/MailMerge/license-agreement.
Advanced Mail-Merge
ZendService\LiveDocx\MailMerge allows designers to insert any number of text fields into a
template. These text fields are populated with data when createDocument() is called.
In addition to text fields, it is also possible specify regions of a document, which should be repeated.
For example, in a telephone bill it is necessary to print out a list of all connections, including the destination number, duration and cost of each call. This repeating row functionality can be achieved with so called blocks.
Blocks are simply regions of a document, which are repeated when createDocument() is called. In a block any
number of block fields can be specified.
Blocks consist of two consecutive document targets with a unique name. The following screenshot illustrates these targets and their names in red:

The format of a block is as follows:
blockStart_ + unique name
blockEnd_ + unique name
For example:
blockStart_block1
blockEnd_block1
The content of a block is repeated, until all data assigned in the block fields has been injected into the template. The data for block fields is specified in PHP as a multi-assoc array.
The following screenshot of a template in Microsoft Word 2007 shows how block fields are used:
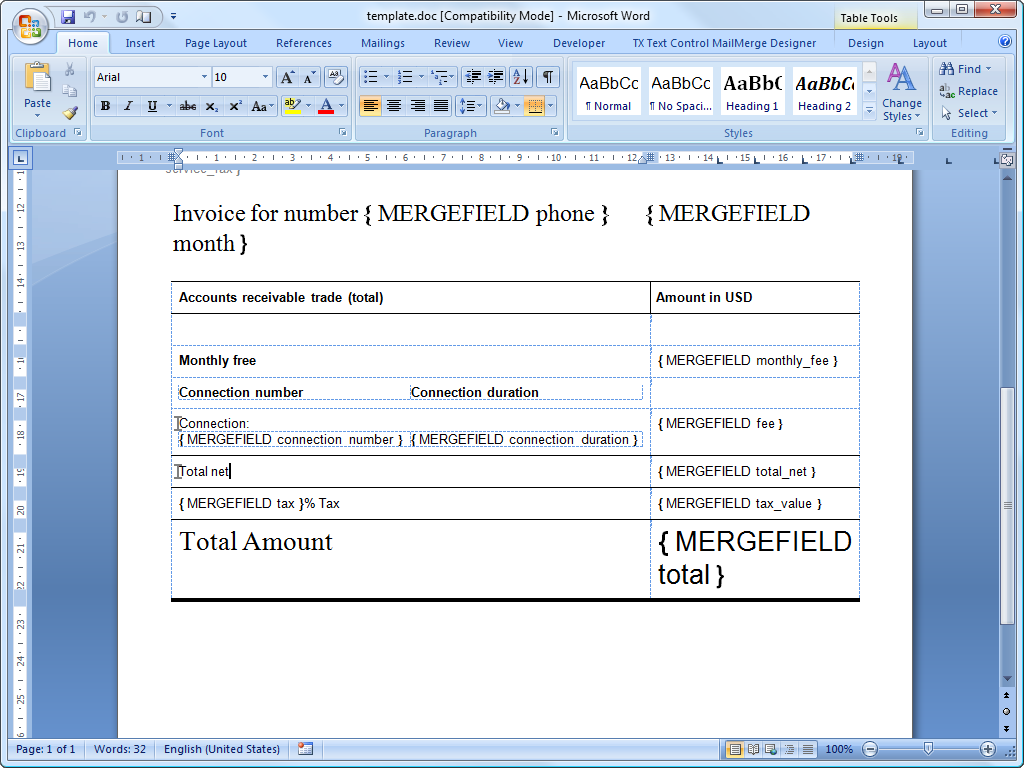
Template, illustrating blocks in Microsoft Word 2007.
The following code populates the above template with data.
1 2 3 4 5 6 7 8 9 10 11 12 13 14 15 16 17 18 19 20 21 22 23 24 25 26 27 28 29 30 31 32 33 34 35 36 37 38 39 40 41 42 43 44 45 46 47 48 49 50 51 52 53 54 55 56 57 58 59 60 61 62 63 64 65 66 67 68 69 70 71 | use ZendService\LiveDocx\MailMerge;
$locale = Locale::getDefault();
$timestamp = time();
$intlDateFormatter1 = new IntlDateFormatter($locale,
IntlDateFormatter::LONG, IntlDateFormatter::NONE);
$intlDateFormatter2 = new IntlDateFormatter($locale,
null, null, null, null, 'LLLL yyyy');
$mailMerge = new MailMerge();
$mailMerge->setUsername('myUsername')
->setPassword('myPassword')
->setService (MailMerge::SERVICE_FREE); // for LiveDocx Premium, use MailMerge::SERVICE_PREMIUM
$mailMerge->setLocalTemplate('telephone-bill-template.doc');
$mailMerge->assign('customer_number', sprintf("#%'10s", rand(0,1000000000)))
->assign('invoice_number', sprintf("#%'10s", rand(0,1000000000)))
->assign('account_number', sprintf("#%'10s", rand(0,1000000000)));
$billData = array (
'phone' => '+22 (0)333 444 555',
'date' => $intlDateFormatter1->format($timestamp),
'name' => 'James Henry Brown',
'service_phone' => '+22 (0)333 444 559',
'service_fax' => '+22 (0)333 444 558',
'month' => $intlDateFormatter2->format($timestamp),
'monthly_fee' => '15.00',
'total_net' => '19.60',
'tax' => '19.00',
'tax_value' => '3.72',
'total' => '23.32'
);
$mailMerge->assign($billData);
$billConnections = array(
array(
'connection_number' => '+11 (0)222 333 441',
'connection_duration' => '00:01:01',
'fee' => '1.15'
),
array(
'connection_number' => '+11 (0)222 333 442',
'connection_duration' => '00:01:02',
'fee' => '1.15'
),
array(
'connection_number' => '+11 (0)222 333 443',
'connection_duration' => '00:01:03',
'fee' => '1.15'
),
array(
'connection_number' => '+11 (0)222 333 444',
'connection_duration' => '00:01:04',
'fee' => '1.15'
)
);
$mailMerge->assign('connection', $billConnections);
$mailMerge->createDocument();
$document = $mailMerge->retrieveDocument('pdf');
file_put_contents('telephone-bill-document.pdf', $document);
unset($mailMerge);
|
The data, which is specified in the array $billConnections is repeated in the template in the block connection.
The keys of the array (connection_number, connection_duration and fee) are the block field names -
their data is inserted, one row per iteration.
The resulting document is written to disk in the file telephone-bill-document.pdf. This file can now be post-processed, sent via e-mail or simply displayed, as is illustrated below in Document Viewer 2.26.1 on Ubuntu 9.04:
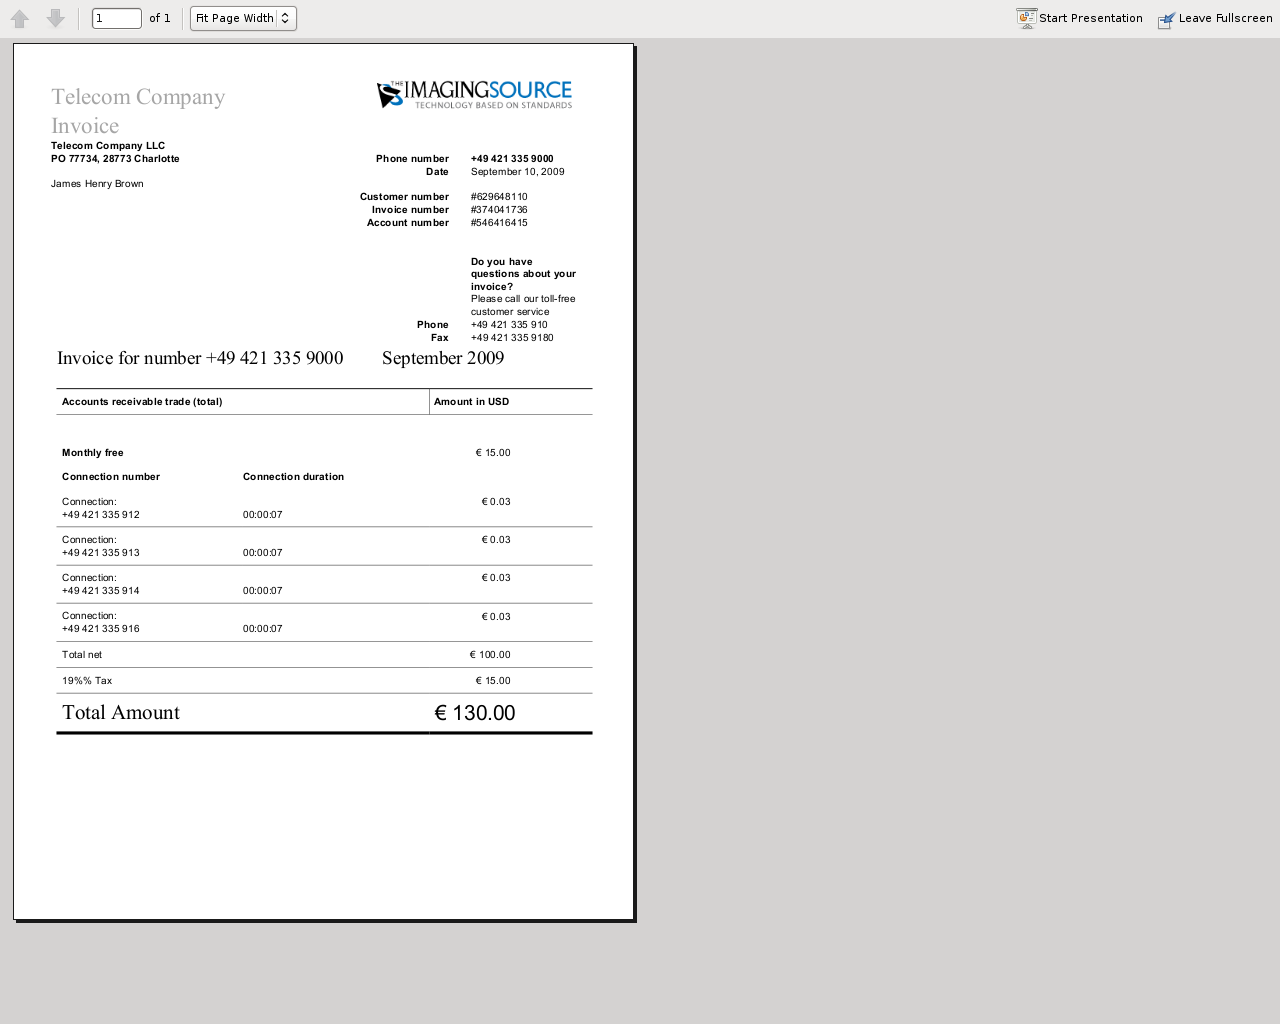
Resulting document as PDF in Document Viewer 2.26.1.
You can download the DOC template file and the resulting PDF document.
Note
Blocks may not be nested.
For executable demo applications, which illustrate the above, please take a look at
/demos/ZendService/LiveDocx/MailMerge/telephone-bill.
Merging Image Data into a Template
In addition to assigning textual data, it is also possible to merge image data into a template. The following code
populates a conference badge template with the photo dailemaitre.jpg, in addition to some textual data.
The first step is to upload the image to the backend service. Once you have done this, you can assign the filename
of the image to the template just as you would any other textual data. Note the syntax of the field name containing
an image - it must start with image:
1 2 3 4 5 6 7 8 9 10 11 12 13 14 15 16 17 18 19 20 21 22 23 24 25 26 27 28 29 30 31 32 33 34 35 36 37 | use ZendService\LiveDocx\MailMerge;
$locale = Locale::getDefault();
$timestamp = time();
$intlDateFormatter = new IntlDateFormatter($locale,
IntlDateFormatter::LONG, IntlDateFormatter::NONE);
$mailMerge = new MailMerge();
$mailMerge->setUsername('myUsername')
->setPassword('myPassword')
->setService (MailMerge::SERVICE_FREE); // for LiveDocx Premium, use MailMerge::SERVICE_PREMIUM
$photoFilename = __DIR__ . '/dailemaitre.jpg';
$photoFile = basename($photoFilename);
if (!$mailMerge->imageExists($photoFile)) { // pass image file *without* path
$mailMerge->uploadImage($photoFilename); // pass image file *with* path
}
$mailMerge->setLocalTemplate('conference-pass-template.docx');
$mailMerge->assign('name', 'Daï Lemaitre')
->assign('company', 'Megasoft Co-operation')
->assign('date', $intlDateFormatter->format($timestamp))
->assign('image:photo', $photoFile); // pass image file *without* path
$mailMerge->createDocument();
$document = $mailMerge->retrieveDocument('pdf');
file_put_contents('conference-pass-document.pdf', $document);
$mailMerge->deleteImage($photoFilename);
unset($mailMerge);
|
For executable demo applications, which illustrate the above, please take a look at
/demos/ZendService/LiveDocx/MailMerge/conference-pass.
Generating Bitmaps Image Files
In addition to document file formats, MailMerge also allows documents to be saved to a
number of image file formats (BMP, GIF, JPG, PNG and TIFF). Each page of the document is saved to one
file.
The following sample illustrates the use of getBitmaps($fromPage, $toPage, $zoomFactor, $format) and
getAllBitmaps($zoomFactor, $format).
$fromPage is the lower-bound page number of the page range that should be returned as an image and $toPage
the upper-bound page number. $zoomFactor is the size of the images, as a percent, relative to the original page
size. The range of this parameter is 10 to 400. $format is the format of the images returned by this method.
The supported formats can be obtained by calling getImageExportFormats().
1 2 3 4 5 6 7 8 9 10 11 12 13 14 15 16 17 18 19 20 21 22 23 24 25 26 27 28 29 30 31 32 33 34 35 36 37 38 39 40 41 42 43 | use ZendService\LiveDocx\MailMerge;
$locale = Locale::getDefault();
$timestamp = time();
$intlTimeFormatter = new IntlDateFormatter($locale,
IntlDateFormatter::NONE, IntlDateFormatter::SHORT);
$intlDateFormatter = new IntlDateFormatter($locale,
IntlDateFormatter::LONG, IntlDateFormatter::NONE);
$mailMerge = new MailMerge();
$mailMerge->setUsername('myUsername')
->setPassword('myPassword')
->setService (MailMerge::SERVICE_FREE); // for LiveDocx Premium, use MailMerge::SERVICE_PREMIUM
$mailMerge->setLocalTemplate('license-agreement-template.docx');
$mailMerge->assign('software', 'Magic Graphical Compression Suite v1.9')
->assign('licensee', 'Henry Döner-Meyer')
->assign('company', 'Co-Operation')
->assign('date', $intlDateFormatter->format($timestamp))
->assign('time', $intlTimeFormatter->format($timestamp))
->assign('city', 'Lyon')
->assign('country', 'France');
$mailMerge->createDocument();
// Get all bitmaps
// (zoomFactor, format)
$bitmaps = $mailMerge->getAllBitmaps(100, 'png');
// Get just bitmaps in specified range
// (fromPage, toPage, zoomFactor, format)
//$bitmaps = $mailMerge->getBitmaps(2, 2, 100, 'png');
foreach ($bitmaps as $pageNumber => $bitmapData) {
$filename = sprintf('license-agreement-page-%d.png', $pageNumber);
file_put_contents($filename, $bitmapData);
}
unset($mailMerge);
|
This produces two files (license-agreement-page-1.png and license-agreement-page-2.png)
and writes them to disk in the same directory as the executable PHP file.
license-agreement-page-1.png.
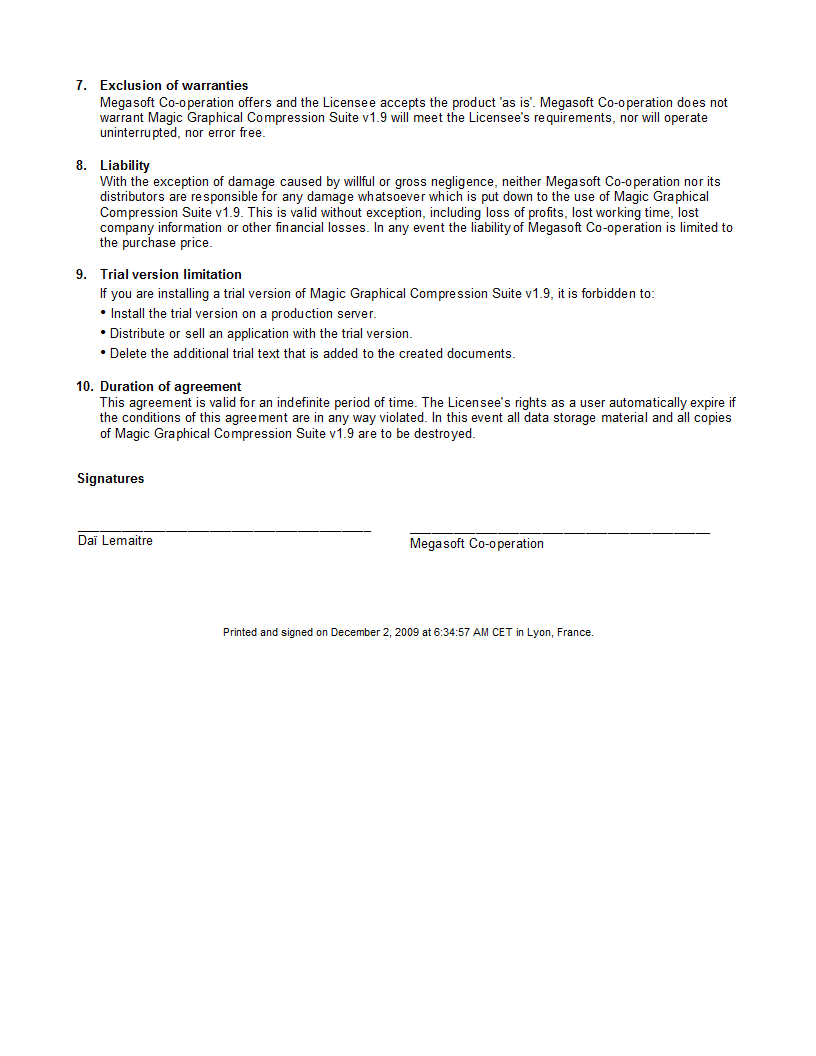
license-agreement-page-2.png.
For executable demo applications, which illustrate the above, please take a look at
/demos/ZendService/LiveDocx/MailMerge/bitmaps.
Local vs. Remote Templates
Templates can be stored locally, on the client machine, or remotely, by LiveDocx. There are advantages and disadvantages to each approach.
In the case that a template is stored locally, it must be transferred from the client to LiveDocx on every request. If the content of the template rarely changes, this approach is inefficient. Similarly, if the template is several megabytes in size, it may take considerable time to transfer it to LiveDocx. Local template are useful in situations in which the content of the template is constantly changing.
The following code illustrates how to use a local template.
1 2 3 4 5 6 7 8 9 10 11 12 13 | use ZendService\LiveDocx\MailMerge;
$mailMerge = new MailMerge();
$mailMerge->setUsername('myUsername')
->setPassword('myPassword')
->setService (MailMerge::SERVICE_FREE); // for LiveDocx Premium, use MailMerge::SERVICE_PREMIUM
$mailMerge->setLocalTemplate('template.docx');
// assign data and create document
unset($mailMerge);
|
In the case that a template is stored remotely, it is uploaded once to LiveDocx and then simply referenced on all subsequent requests. Obviously, this is much quicker than using a local template, as the template does not have to be transferred on every request. For speed critical applications, it is recommended to use the remote template method.
The following code illustrates how to upload a template to the server:
1 2 3 4 5 6 7 8 9 10 11 | use ZendService\LiveDocx\MailMerge;
$mailMerge = new MailMerge();
$mailMerge->setUsername('myUsername')
->setPassword('myPassword')
->setService (MailMerge::SERVICE_FREE); // for LiveDocx Premium, use MailMerge::SERVICE_PREMIUM
$mailMerge->uploadTemplate('template.docx');
unset($mailMerge);
|
The following code illustrates how to reference the remotely stored template on all subsequent requests:
1 2 3 4 5 6 7 8 9 10 11 12 13 | use ZendService\LiveDocx\MailMerge;
$mailMerge = new MailMerge();
$mailMerge->setUsername('myUsername')
->setPassword('myPassword')
->setService (MailMerge::SERVICE_FREE); // for LiveDocx Premium, use MailMerge::SERVICE_PREMIUM
$mailMerge->setRemoteTemplate('template.docx');
// assign data and create document
unset($mailMerge);
|
For executable demo applications, which illustrate the above, please take a look at
/demos/ZendService/LiveDocx/MailMerge/templates.
Getting Information
ZendService\LiveDocx\MailMerge provides a number of methods to get information on field names,
available fonts and supported formats.
Get Array of Field Names in Template
The following code returns and displays an array of all field names in the specified template. This functionality is useful, in the case that you create an application, in which an end-user can update a template.
1 2 3 4 5 6 7 8 9 10 11 12 13 14 15 16 17 | use ZendService\LiveDocx\MailMerge;
$mailMerge = new MailMerge();
$mailMerge->setUsername('myUsername')
->setPassword('myPassword')
->setService (MailMerge::SERVICE_FREE); // for LiveDocx Premium, use MailMerge::SERVICE_PREMIUM
$templateName = 'template-1-text-field.docx';
$mailMerge->setLocalTemplate($templateName);
$fieldNames = $mailMerge->getFieldNames();
foreach ($fieldNames as $fieldName) {
printf('- %s%s', $fieldName, PHP_EOL);
}
unset($mailMerge);
|
For executable demo applications, which illustrate the above, please take a look at
/demos/ZendService/LiveDocx/MailMerge/template-info.
Get Array of Block Field Names in Template
The following code returns and displays an array of all block field names in the specified template. This functionality is useful, in the case that you create an application, in which an end-user can update a template. Before such templates can be populated, it is necessary to find out the names of the contained block fields.
1 2 3 4 5 6 7 8 9 10 11 12 13 14 15 16 17 18 19 20 | use ZendService\LiveDocx\MailMerge;
$mailMerge = new MailMerge();
$mailMerge->setUsername('myUsername')
->setPassword('myPassword')
->setService (MailMerge::SERVICE_FREE); // for LiveDocx Premium, use MailMerge::SERVICE_PREMIUM
$templateName = 'template-block-fields.doc';
$mailMerge->setLocalTemplate($templateName);
$blockNames = $mailMerge->getBlockNames();
foreach ($blockNames as $blockName) {
$blockFieldNames = $mailMerge->getBlockFieldNames($blockName);
foreach ($blockFieldNames as $blockFieldName) {
printf('- %s::%s%s', $blockName, $blockFieldName, PHP_EOL);
}
}
unset($mailMerge);
|
For executable demo applications, which illustrate the above, please take a look at
/demos/ZendService/LiveDocx/MailMerge/template-info.
Get Array of Fonts Installed on Server
The following code returns and displays an array of all fonts installed on the server. You can use this method to present a list of fonts which may be used in a template. It is important to inform the end-user about the fonts installed on the server, as only these fonts may be used in a template. In the case that a template contains fonts, which are not available on the server, font-substitution will take place. This may lead to undesirable results.
1 2 3 4 5 6 7 8 9 10 11 12 | use ZendService\LiveDocx\MailMerge;
use Zend\Debug\Debug;
$mailMerge = new MailMerge();
$mailMerge->setUsername('myUsername')
->setPassword('myPassword')
->setService (MailMerge::SERVICE_FREE); // for LiveDocx Premium, use MailMerge::SERVICE_PREMIUM
Debug::dump($mailMerge->getFontNames());
unset($mailMerge);
|
Note
As the return value of this method changes very infrequently, it is highly recommended to use a cache,
such as Zend\Cache\Cache- this will considerably speed up your application.
For executable demo applications, which illustrate the above, please take a look at
/demos/ZendService/LiveDocx/MailMerge/supported-fonts.
Get Array of Supported Template File Formats
The following code returns and displays an array of all supported template file formats. This method is particularly useful in the case that a combo list should be displayed that allows the end-user to select the input format of the documentation generation process.
1 2 3 4 5 6 7 8 9 10 11 12 | use ZendService\LiveDocx\MailMerge;
use Zend\Debug\Debug;
$mailMerge = new MailMerge()
$mailMerge->setUsername('myUsername')
->setPassword('myPassword')
->setService (MailMerge::SERVICE_FREE); // for LiveDocx Premium, use MailMerge::SERVICE_PREMIUM
Debug::dump($mailMerge->getTemplateFormats());
unset($mailMerge);
|
Note
As the return value of this method changes very infrequently, it is highly recommended to use a cache,
such as Zend\Cache\Cache- this will considerably speed up your application.
For executable demo applications, which illustrate the above, please take a look at
/demos/ZendService/LiveDocx/MailMerge/supported-formats.
Get Array of Supported Document File Formats
The following code returns and displays an array of all supported document file formats. This method is particularly useful in the case that a combo list should be displayed that allows the end-user to select the output format of the documentation generation process.
1 2 3 4 5 6 7 8 9 10 11 12 | use ZendService\LiveDocx\MailMerge;
use Zend\Debug\Debug;
$mailMerge = new MailMerge();
$mailMerge->setUsername('myUsername')
->setPassword('myPassword')
->setService (MailMerge::SERVICE_FREE); // for LiveDocx Premium, use MailMerge::SERVICE_PREMIUM
Debug::dump($mailMerge->getDocumentFormats());
unset($mailMerge);
|
For executable demo applications, which illustrate the above, please take a look at
/demos/ZendService/LiveDocx/MailMerge/supported-formats.
Get Array of Supported Image File Formats
The following code returns and displays an array of all supported image file formats. This method is particularly useful in the case that a combo list should be displayed that allows the end-user to select the output format of the documentation generation process.
1 2 3 4 5 6 7 8 9 10 11 12 | use ZendService\LiveDocx\MailMerge;
use Zend\Debug\Debug;
$mailMerge = new MailMerge();
$mailMerge->setUsername('myUsername')
->setPassword('myPassword')
->setService (MailMerge::SERVICE_FREE); // for LiveDocx Premium, use MailMerge::SERVICE_PREMIUM
Debug::dump($mailMerge->getImageExportFormats());
unset($mailMerge);
|
Note
As the return value of this method changes very infrequently, it is highly recommended to use a cache,
such as Zend\Cache\Cache- this will considerably speed up your application.
For executable demo applications, which illustrate the above, please take a look at
/demos/ZendService/LiveDocx/MailMerge/supported-formats.
