The MyTaskList application
The application we are going to create is a to-do list manager. The application will allow us to create to-do items and check them off. We’ll also need the ability to edit and delete an item. As we are building a simple application, we need just four pages:
| Page | Notes |
|---|---|
| Checklist homepage | This will display the list of to-do items. |
| Add new item | This page will provide a form for adding a new item. |
| Edit item | This page will provide a form for editing an item. |
| Delete item | This page will confirm that we want to delete an item and then delete it. |
Each page of the application is known as an action, and actions are grouped into
controllers within modules. Generally, related actions are placed into a single
controller; for instance, a news controller might have actions of current,
archived and view.
We will store information about our to-do items in a database. A single table will suffice with the following fields:
| Field name | Type | Null? | Notes |
|---|---|---|---|
| id | integer | No | Primary key, auto-increment |
| title | varchar(100) | No | Name of the file on disk |
| completed | tinyint | No | Zero if not done, one if done |
| created | datetime | No | Date that the to-do item was created |
We are going to use MySQL, via PHP’s PDO driver, so create a database called
mytasklist using your preferred MySQL client, and run these SQL statements
to create the task_item table and some sample data:
Note that if you have Zend Studio, you can use the built-in Database Connectivity features. This if found in the Database Development perspective (Window | Open Perspective | Other | Database Development menu item) and further details are in the Zend Studio manual.
The Checklist module
We will create all our code within a module called Checklist. The
Checklist module will, therefore, contain our controllers, models, forms and
views, along with specific configuration files.
We create our new Checklist module in Zend Studio. In the PHP Explorer on
the left, right click on the MyTaskList project folder and choose New -> Zend
Framework Item. Click on Zend Module and press Next. The Source Folder should
already be set to /MyTaskList/module. Enter Checklist as the Module name
and Task as the Controller name and then press Finish:

The wizard will now go ahead and create a blank module for us and register it
with the Module Manager’s application.config.php. You can see what it has
done in the PHP Explorer view under the module folder:
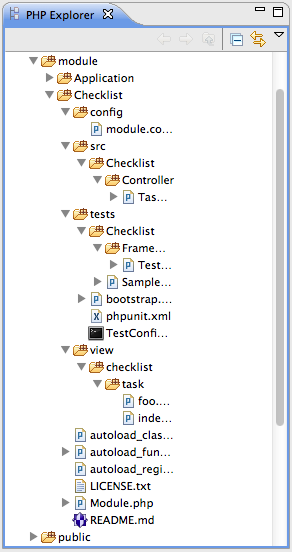
As you can see the Checklist module has separate directories for the different
types of files we will have. The config folder contains configuration files,
and the PHP files that contain classes within the Checklist namespace live
in the src/Checklist directory. The view directory also has a sub-
folder called checklist for our module’s view scripts, and the tests
folder contains PHPUnit test files.
The Module class
As mentioned earlier, a module’s Module class contains methods that are
called during the start-up process and is also used to register listeners that
will be triggered during the dispatch process. The Module class created for
us contains three methods: getAutoloaderConfig(), getConfig() and
onBootstrap() which are called by the Module Manager during start-up.
Autoloading files
Our getAutoloaderConfig() method returns an array that is compatible with
ZF2’s AutoloaderFactory. It is configured for us with both a classmap file
(autoload_classmap.php) and a standard autoloader to load any files in
src/Checklist according to the PSR-0 rules .
Classmap autoloading is faster, but requires adding each new class you create to
the array within the autoload_classmap.php file, which slows down development.
The standard autoloader, however, doesn’t have this requirement and will always
load a class if its file is named correctly. This allows us to develop quickly
by creating new classes when we need them and then gain a performance boost by
using the classmap autoloader in production. Zend Framework 2 provides
bin/classmap_generator.php to create and update the file.
Configuration
The getConfig() method in Checklist\Module is called by the Module
Manager to retrieve the configuration information for this module. By tradition,
this method simply loads the config/module.config.php file which is an
associative array. In practice, the Module Manager requires that the returned
value from getConfig() be a Traversable, which means that you can use
any configuration format that Zend\Config supports. You will find, though,
that most examples use arrays as they are easy to understand and fast.
The actual configuration information is placed in config/module.config.php.
This nested array provides the key configuration for our module. The
controllers sub-array is used to register this module’s controller classes
with the Controller Service Manager which is used by the dispatcher to
instantiate a controller. The one controller that we need, TaskController,
is already registered for us.
The router sub-array provides the configuration of the routes that are used
by this module. A route is the way that a URL is mapped to a to a particular
action method within a controller class. Zend Studio’s default configuration is
set up so that a URL of /checklist/foo/bar maps to the barAction()
method of the FooController within the Checklist module. We will modify
this later.
Finally, the view_manager sub-array within the module.config.php file is
used to register the directory where our view files are with the View sub-
system. This means that within the view/checklist sub-folder, there is a
folder for each controller. We have one controller, TaskController, so there
is a single sub-folder in view/checklist called task. Within this
folder, there are separate .phtml files which contain the specific HTML for
each action of our module.
Registering events
The onBootstrap() method in the Module class is the easiest place to
register listeners for the MVC events that are triggered by the Event Manager.
Note that the default method body provided by Zend Studio is not needed as the
ModuleRouteListener is already registered by the Application module. We
do not have to register any events for this tutorial, so go ahead and delete the
entire OnBootstrap() method.
The application’s pages
As we have four pages that all apply to tasks, we will group them in a single
controller called TaskController within our Checklist module as four
actions. Each action has a related URL which will result in that action being
dispatched. The four actions and URLs are:
| Page | URL | Action |
|---|---|---|
| Homepage | /task |
index |
| Add new task | /task/add |
add |
| Edit task | /task/edit |
edit |
| Delete task | /task/delete |
delete |
The mapping of a URL to a particular action is done using routes that are
defined in the module’s module.config.php file. As noted earlier, the
configuration file, module.config.php created by Zend Studio has a route
called checklist set up for us.
Routing
The default route provided for us isn’t quite what we need. The checklist
route is defined like this:
module/Checklist/src/config/module.config.php:
1 2 3 4 5 6 7 8 9 10 11 12 13 14 15 16 17 18 19 20 21 22 | 'router' => array(
'routes' => array(
'checklist' => array(
'type' => 'Literal',
'options' => array(
'route' => '/task',
'defaults' => array(
'__NAMESPACE__' => 'Checklist\Controller',
'controller' => 'Task',
'action' => 'index',
),
),
'may_terminate' => true,
'child_routes' => array(
'default' => array(
'type' => 'Segment',
'options' => array(
'route' => '/[:controller[/:action]]',
),
),
),
),
|
This defines a main route called checklist, which maps the URL /task to
the index action of the Task controller and then there is a child route called
default which maps /task/{controller name}/{action name} to the {action
name} action of the {controller name} controller. This means that, by
default, the URL to call the add action of the Task controller would be
/task/task/add. This doesn’t look very nice and we would like to shorten it
to /task/add.
To fix this, we will rename the route from checklist to task because
this route will be solely for the Task controller. We will then redefine it to
be a single Segment type route that can handle actions as well as just route
to the index action
Open module/Checklist/config/module.config.php in Zend Studio and change the
entire router section of the array to be:
module/Checklist/src/config/module.config.php:
1 2 3 4 5 6 7 8 9 10 11 12 13 14 15 16 17 18 19 | 'router' => array(
'routes' => array(
'task' => array(
'type' => 'Segment',
'options' => array(
'route' => '/task[/:action[/:id]]',
'defaults' => array(
'__NAMESPACE__' => 'Checklist\Controller',
'controller' => 'Task',
'action' => 'index',
),
'constraints' => array(
'action' => '(add|edit|delete)',
'id' => '[0-9]+',
),
),
),
),
),
|
We have now renamed the route to task and have set it up as a Segment route
with two optional parameters in the URL: action and id. We have set a
default of index for the action, so that if the URL is simply /task,
then we shall use the index action in our controller.
The optional constraints section allow us to specify regular expression
patterns that match the characters that we expect for a given parameter. For
this route, we have specified that the action parameter must be either add,
edit or delete and that the id parameter must only contain numbers.
The routing for our Checklist module is now set up, so we can now turn our attention to the controller.
The TaskController
In Zend Framework 2, the controller is a class that is generally called
{Controller name}Controller. Note that {Controller name} starts with a
capital letter. This class lives in a file called {Controller
name}Controller.php within the Controller directory for the module. In our
case that’s the module/Checklist/src/Checklist/Controller directory. Each
action is a public function within the controller class that is named {action
name}Action. In this case {action name} should start with a lower case
letter.
Note that this is merely a convention. Zend Framework 2’s only restrictions on a
controller is that it must implement the Zend\Stdlib\Dispatchable interface.
The framework provides two abstract classes that do this for us:
Zend\Mvc\Controller\ActionController and
Zend\Mvc\Controller\RestfulController. We’ll be using the
AbstractActionController, but if you’re intending to write a RESTful web service,
AbstractRestfulController may be useful.
Zend Studio’s module creation wizard has already created TaskController for
us with two action methods in it: indexAction() and fooAction(). Remove
the fooAction() method and the default “Copyright Zend” DocBlock comment at
the top of the file. Your controller should now look like this:
module/Checklist/src/Checklist/Controller/TaskController.php:
1 2 3 4 5 6 7 8 9 10 11 12 | namespace Checklist\Controller;
use Zend\Mvc\Controller\AbstractActionController;
class TaskController extends AbstractActionController
{
public function indexAction()
{
return array();
}
}
|
This controller now contains the action for the home page which will display our list of to-do items. We now need to create a model-layer that can retrieve the tasks from the database for display.
The model
It is time to look at the model section of our application. Remember that the
model is the part that deals with the application’s core purpose (the so-called
“business rules”) and, in our case, deals with the database. Zend Framework does
not provide a Zend\Model component because the model is your business logic
and it’s up to you to decide how you want it to work.
There are many components that you can use for this depending on your needs. One
approach is to have model classes represent each entity in your application and
then use mapper objects that load and save entities to the database. Another is
to use an Object-relational mapping (ORM) technology, such as Doctrine or
Propel. For this tutorial, we are going to create a fairly simple model layer
using an entity and a mapper that uses the Zend\Db component. In a larger,
more complex, application, you would probably also have a service class that
interfaces between the controller and the mapper.
We already have created the database table and added some sample data, so let’s
start by creating an entity object. An entity object is a simple PHP object that
represents a thing in the application. In our case, it represents a task to be
completed, so we will call it TaskEntity.
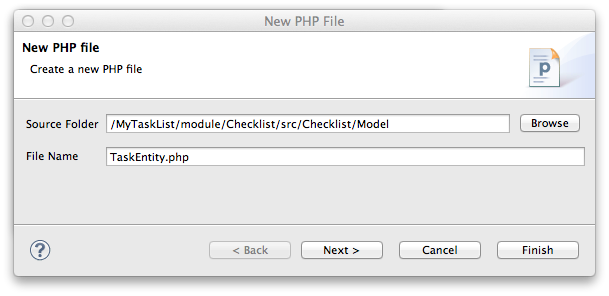
Create a new folder in module/Checklist/src/Checklist called Model and
then right click on the new Model folder and choose New -> PHP File. In the
New PHP File dialog, set the File Name to TaskEntity.php as shown and then
press Finish.
This will create a blank PHP file. Update it so that it looks like this:
module/Checklist/src/Checklist/Model/TaskEntity.php:
1 2 3 4 5 6 7 8 9 10 11 12 13 14 15 16 17 18 19 20 21 22 23 24 25 26 27 28 29 30 31 32 33 34 35 36 37 38 39 40 41 42 43 44 45 46 47 48 49 50 51 52 53 54 55 | <?php
namespace Checklist\Model;
class TaskEntity
{
protected $id;
protected $title;
protected $completed = 0;
protected $created;
public function __construct()
{
$this->created = date('Y-m-d H:i:s');
}
public function getId()
{
return $this->id;
}
public function setId($Value)
{
$this->id = $Value;
}
public function getTitle()
{
return $this->title;
}
public function setTitle($Value)
{
$this->title = $Value;
}
public function getCompleted()
{
return $this->completed;
}
public function setCompleted($Value)
{
$this->completed = $Value;
}
public function getCreated()
{
return $this->created;
}
public function setCreated($Value)
{
$this->created = $Value;
}
}
|
The Task entity is a simple PHP class with four properties with getter and
setter methods for each property. We also have a constructor to fill in the
created property. If you are using Zend Studio rather than Eclipse PDT, then
you can generate the getter and setter methods by right clicking in the file and
choosing Source -> Generate Getters and Setters.
We now need a mapper class which is responsible for persisting task entities to
the database and populating them with new data. Again, right click on the Model
folder and choose New -> PHP File and create a PHP file called
TaskMapper.php. Update it so that it looks like this:
module/Checklist/src/Checklist/Model/TaskMapper.php:
1 2 3 4 5 6 7 8 9 10 11 12 13 14 15 16 17 18 19 20 21 22 23 24 25 26 27 28 29 30 31 32 33 34 35 36 37 38 | <?php
namespace Checklist\Model;
use Zend\Db\Adapter\Adapter;
use Checklist\Model\TaskEntity;
use Zend\Stdlib\Hydrator\ClassMethods;
use Zend\Db\Sql\Sql;
use Zend\Db\Sql\Select;
use Zend\Db\ResultSet\HydratingResultSet;
class TaskMapper
{
protected $tableName = 'task_item';
protected $dbAdapter;
protected $sql;
public function __construct(Adapter $dbAdapter)
{
$this->dbAdapter = $dbAdapter;
$this->sql = new Sql($dbAdapter);
$this->sql->setTable($this->tableName);
}
public function fetchAll()
{
$select = $this->sql->select();
$select->order(array('completed ASC', 'created ASC'));
$statement = $this->sql->prepareStatementForSqlObject($select);
$results = $statement->execute();
$entityPrototype = new TaskEntity();
$hydrator = new ClassMethods();
$resultset = new HydratingResultSet($hydrator, $entityPrototype);
$resultset->initialize($results);
return $resultset;
}
}
|
Within this mapper class we have implemented the fetchAll() method and a
constructor. There’s quite a lot going on here as we’re dealing with the
Zend\Db component, so let’s break it down. Firstly we have the constructor
which takes a Zend\Db\Adapter\Adapter parameter as we can’t do anything
without a database adapter. Zend\Db\Sql is an object that abstracts SQL
statements that are compatible with the underlying database adapter in use. We
are going to use this object for all of our interaction with the database, so we
create it in the constructor.
The fetchAll() method retrieves data from the database and places it into a
HydratingResultSet which is able to return populated TaskEntity objects
when iterating. To do this, we have three distinct things happening. Firstly we
retrieve a Select object from the Sql object and use the order()
method to place completed items last. We then create a Statement object and
execute it to retrieve the data from the database. The $results object can
be iterated over, but will return an array for each row retrieved but we want a
`` TaskEntity`` object. To get this, we create a HydratingResultSet which
requires a hydrator and an entity prototype to work.
The hydrator is an object that knows how to populate an entity. As there are
many ways to create an entity object, there are multiple hydrator objects
provided with ZF2 and you can create your own. For our TaskEntity, we use
the ClassMethods hydrator which expects a getter and a setter method for
each column in the resultset. Another useful hydrator is ArraySerializable
which will call getArrayCopy() and populate() on the entity object when
transferring data. The HydratingResultSet uses the prototype design pattern
when creating the entities when iterating. This means that instead of
instantiating a new instance of the entity class on each iteration, it clones
the provided instantiated object. See http://ralphschindler.com/2012/03/09/php-
constructor-best-practices-and-the-prototype-pattern for more details.
Finally, fetchAll() returns the result set object with the correct data in it.
Using Service Manager to configure the database credentials and inject into the controller
In order to always use the same instance of our TaskMapper, we will use the
Service Manager to define how to create the mapper and also to retrieve it when
we need it. This is most easily done in the Module class where we create a
method called getServiceConfig() which is automatically called by the Module
Manager and applied to the Service Manager. We’ll then be able to retrieve it in
our controller when we need it.
To configure the Service Manager we can either supply the name of the class to
be instantiated or create a factory (closure or callback) method that
instantiates the object when the Service Manager needs it. We start by
implementing getServiceConfig() and write a closure that creates a
TaskMapper instance. Add this method to the Module class:
module/Checklist/Module.php:
1 2 3 4 5 6 7 8 9 10 11 12 13 14 15 | class Module
{
public function getServiceConfig()
{
return array(
'factories' => array(
'TaskMapper' => function ($sm) {
$dbAdapter = $sm->get('Zend\Db\Adapter\Adapter');
$mapper = new TaskMapper($dbAdapter);
return $mapper;
}
),
);
}
// ...
|
Don’t forget to add use Checklist\Model\TaskMapper; to the list of use
statements at the top of the file.
The getServiceConfig() method returns an array of class creation definitions
that are all merged together by the Module Manager before passing to the Service
Manager. To create a service within the Service Manager we use a unique key
name, TaskMapper. As this has to be unique, it’s common (but not a
requirement) to use the fully qualified class name as the Service Manager key
name. We then define a closure that the Service Manager will call when it is
asked for an instance of TaskMapper. We can do anything we like in this
closure, as long as we return an instance of the required class. In this case,
we retrieve an instance of the database adapter from the Service Manager and
then instantiate a TaskMapper object and return it. This is an example of
the Dependency Injection pattern at work as we have
injected the database adapter into the mapper. This also means that Service
Manager can be used as a Dependency Injection Container in addition to a Service
Locator.
As we have requested an instance of Zend\Db\Adapter\Adapter from the Service
Manager, we also need to configure the Service Manager so that it knows how to
instantiate a Zend\Db\Adapter\Adapter. This is done using a class provided
by Zend Framework called Zend\Db\Adapter\AdapterServiceFactory which we can
configure within the merged configuration system. As we noted earlier, the
Module Manager merges all the configuration from each module and then merges in
the files in the config/autoload directory (*.global.php and then
*.local.php files). We’ll add our database configuration information to
global.php which you should commit to your version control system.You can
then use local.php (outside of the VCS) to store the credentials for your
database.
Open config/autoload/global.php and replace the empty array with:
config/autoload/global.php:
1 2 3 4 5 6 7 8 9 10 11 12 13 14 15 | return array(
'service_manager' => array(
'factories' => array(
'Zend\Db\Adapter\Adapter' =>
'Zend\Db\Adapter\AdapterServiceFactory',
),
),
'db' => array(
'driver' => 'Pdo',
'dsn' => 'mysql:dbname=mytasklist;hostname=localhost',
'driver_options' => array(
PDO::MYSQL_ATTR_INIT_COMMAND => 'SET NAMES \'UTF8\''
),
),
);
|
Firstly, we provide additional Service Manager configuration in the
service_manager section, This array works exactly the same as the one in
getServiceConfig(), except that you should not use closures in a config file
as if you do Module Manager will not be able to cache the merged configuration
information. As we already have an implementation for creating a
Zend\Db\Adapter\Adapter, we use the factories sub-array to map the key
name of Zend\Db\Adapter\Adapter to the string name of the factory class
(Zend\Db\Adapter\AdapterServiceFactory’) and the Service Manager will then
use ZendDbAdapterAdapterServiceFactory to instantiate a database adapter for
us.
The Zend\Db\Adapter\AdapterServiceFactory object looks for a key called
db in the configuration array and uses this to configure the database
adapter. Therefore, we create the db key in our global.php file with the
relevant configuration data. The only data that is missing is the username and
password required to connect to the database. We do not want to store this in
the version control system, so we store this in the local.php configuration
file, which, by default, is ignored by git.
Open config/autoload/local.php and replace the empty array with:
config/autoload/local.php:
1 2 3 4 5 6 | return array(
'db' => array(
'username' => 'YOUR_USERNAME',
'password' => 'YOUR_PASSWORD',
),
);
|
Obviously you should replace YOUR_USERNAME and YOUR_PASSWORD with the correct credentials.
Now that the Service Manager can create a TaskMapper instance for us, we can
add a method to the controller to retrieve it. Add getTaskMapper() to the
TaskController class:
module/Checklist/src/Checklist/Controller/TaskController.php:
1 2 3 4 5 | public function getTaskMapper()
{
$sm = $this->getServiceLocator();
return $sm->get('TaskMapper');
}
|
We can now call getTaskMapper() from within our controller whenever we need
to interact with our model layer. Let’s start with a list of tasks when the
index action is called.
