Database and models
The database
Now that we have the Album module set up with controller action methods and
view scripts, it is time to look at the model section of our application.
Remember that the model is the part that deals with the application’s core
purpose (the so-called “business rules”) and, in our case, deals with the
database. We will make use of the Zend Framework class
Zend\Db\TableGateway\TableGateway which is used to find, insert, update and
delete rows from a database table.
We are going to use MySQL, via PHP’s PDO driver, so create a database called
zf2tutorial, and run these SQL statements to create the album table with some
data in it.
CREATE TABLE album (
  id int(11) NOT NULL auto_increment,
  artist varchar(100) NOT NULL,
  title varchar(100) NOT NULL,
  PRIMARY KEY (id)
);
INSERT INTO album (artist, title)
    VALUES  ('The  Military  Wives',  'In  My  Dreams');
INSERT INTO album (artist, title)
    VALUES  ('Adele',  '21');
INSERT INTO album (artist, title)
    VALUES  ('Bruce  Springsteen',  'Wrecking Ball (Deluxe)');
INSERT INTO album (artist, title)
    VALUES  ('Lana  Del  Rey',  'Born  To  Die');
INSERT INTO album (artist, title)
    VALUES  ('Gotye',  'Making  Mirrors');
(The test data chosen happens to be the Bestsellers on Amazon UK at the time of writing!)
We now have some data in a database and can write a very simple model for it.
The model files
Zend Framework does not provide a Zend\Model component as the model is your
business logic and it’s up to you to decide how you want it to work. There are
many components that you can use for this depending on your needs. One approach
is to have model classes represent each entity in your application and then
use mapper objects that load and save entities to the database. Another is to
use an ORM like Doctrine or Propel.
For this tutorial, we are going to create a very simple model by creating an
AlbumTable class that extends Zend\Db\TableGateway\TableGateway where
each album object is an Album object (known as an entity). This is an
implementation of the Table Data Gateway design pattern to allow for interfacing
with data in a database table. Be aware though that the Table Data Gateway
pattern can become limiting in larger systems. There is also a temptation to put
database access code into controller action methods as these are exposed by
Zend\Db\TableGateway\AbstractTableGateway. Don’t do this!
Let’s start with our Album entity class within the Model directory:
// module/Album/src/Album/Model/Album.php:
namespace Album\Model;

class Album
{
    public $id;
    public $artist;
    public $title;

    public function exchangeArray($data)
    {
        $this->id     = (isset($data['id'])) ? $data['id'] : null;
        $this->artist = (isset($data['artist'])) ? $data['artist'] : null;
        $this->title  = (isset($data['title'])) ? $data['title'] : null;
    }
}
Our Album entity object is a simple PHP class. In order to work with
Zend\Db’s AbstractTableGateway class, we need to implement the
exchangeArray() method. This method simply copies the data from the passed
in array to our entity’s properties. We will add an input filter for use with
our form later.
Next, we extend Zend\Db\TableGateway\AbstractTableGateway and create our own
AlbumTable class in the module’s Model directory like this:
// module/Album/src/Album/Model/AlbumTable.php:
namespace Album\Model;

use Zend\Db\Adapter\Adapter;
use Zend\Db\ResultSet\ResultSet;
use Zend\Db\TableGateway\AbstractTableGateway;

class AlbumTable extends AbstractTableGateway
{
    protected $table ='album';

    public function __construct(Adapter $adapter)
    {
        $this->adapter = $adapter;
        $this->resultSetPrototype = new ResultSet();
        $this->resultSetPrototype->setArrayObjectPrototype(new Album());
        $this->initialize();
    }

    public function fetchAll()
    {
        $resultSet = $this->select();
        return $resultSet;
    }

    public function getAlbum($id)
    {
        $id  = (int) $id;
        $rowset = $this->select(array('id' => $id));
        $row = $rowset->current();
        if (!$row) {
            throw new \Exception("Could not find row $id");
        }
        return $row;
    }

    public function saveAlbum(Album $album)
    {
        $data = array(
            'artist' => $album->artist,
            'title'  => $album->title,
        );
        $id = (int)$album->id;
        if ($id == 0) {
            $this->insert($data);
        } else {
            if ($this->getAlbum($id)) {
                $this->update($data, array('id' => $id));
            } else {
                throw new \Exception('Form id does not exist');
            }
        }
    }

    public function deleteAlbum($id)
    {
        $this->delete(array('id' => $id));
    }
}
There’s a lot going on here. Firstly, we set the protected property $table
to the name of the database table, ‘album’ in this case. We then write a
constructor that takes a database adapter as its only parameter and assigns it
to the adapter property of our class. We then need to tell the table gateway’s
result set that whenever it creates a new row object, it should use an Album
object to do so. The TableGateway classes use the prototype pattern for
creation of result sets and entities. This means that instead of instantiating
when required, the system clones a previously instantiated object. See
PHP Constructor Best Practices and the Prototype Pattern
for more details.
We then create some helper methods that our application will use to interface
with the database table. fetchAll() retrieves all albums rows from the
database as a ResultSet, getAlbum() retrieves a single row as an
Album object, saveAlbum() either creates a new row in the database or
updates a row that already exists and deleteAlbum() removes the row
completely. The code for each of these methods is, hopefully, self-explanatory.
Using ServiceManager to configure the database credentials and inject into the controller
In order to always use the same instance of our AlbumTable, we will use the
ServiceManager to define how to create one. This is most easily done in the
Module class where we create a method called getServiceConfig() which is
automatically called by the ModuleManager and applied to the ServiceManager.
We’ll then be able to retrieve it in our controller when we need it.
To configure the ServiceManager, we can either supply the name of the class
to be instantiated or a factory (closure or callback) that instantiates the
object when the ServiceManager needs it. We start by implementing
getServiceConfig() to provide a factory that creates an AlbumTable. Add
this method to the bottom of the Module class.
// module/Album/Module.php:
namespace Album;

// Add this import statement:
use Album\Model\AlbumTable;

class Module
{
    // getAutoloaderConfig() and getConfig() methods here

    // Add this method:
    public function getServiceConfig()
    {
        return array(
            'factories' => array(
                'Album\Model\AlbumTable' =>  function($sm) {
                    $dbAdapter = $sm->get('Zend\Db\Adapter\Adapter');
                    $table     = new AlbumTable($dbAdapter);
                    return $table;
                },
            ),
        );
    }
}
This method returns an array of factories that are all merged together by
the ModuleManager before passing to the ServiceManager. We also need to
configure the ServiceManager so that it knows how to get a
Zend\Db\Adapter\Adapter. This is done using a factory called
Zend\Db\Adapter\AdapterServiceFactory which we can configure within the
merged config system. Zend Framework 2’s ModuleManager merges all the
configuration from each module’s module.config.php file and then merges in
the files in config/autoload (*.global.php and then *.local.php
files). We’ll add our database configuration information to global.php which
you should commit to your version control system.You can use local.php
(outside of the VCS) to store the credentials for your database if you want to.
// config/autoload/global.php:
return array(
    'db' => array(
        'driver'         => 'Pdo',
        'dsn'            => 'mysql:dbname=zf2tutorial;host=localhost',
        'driver_options' => array(
            PDO::MYSQL_ATTR_INIT_COMMAND => 'SET NAMES \'UTF8\''
        ),
    ),
    'service_manager' => array(
        'factories' => array(
            'Zend\Db\Adapter\Adapter'
                    => 'Zend\Db\Adapter\AdapterServiceFactory',
        ),
    ),
);
You should put your database credentials in config/autoloader/local.php so
that they are not in the git repository (as local.php is ignored):
// config.autoload/local.php:
return array(
    'db' => array(
        'username' => 'YOUR USERNAME HERE',
        'password' => 'YOUR PASSWORD HERE',
    ),
);
Now that the ServiceManager can create an AlbumTable instance for us, we
can add a method to the controller to retrieve it. Add getAlbumTable() to
the AlbumController class:
// module/Album/src/Album/Controller/AlbumController.php:
    public function getAlbumTable()
    {
        if (!$this->albumTable) {
            $sm = $this->getServiceLocator();
            $this->albumTable = $sm->get('Album\Model\AlbumTable');
        }
        return $this->albumTable;
    }
You should also add:
protected $albumTable;
to the top of the class.
We can now call getAlbumTable() from within our controller whenever we need
to interact with our model. Let’s start with a list of albums when the index
action is called.
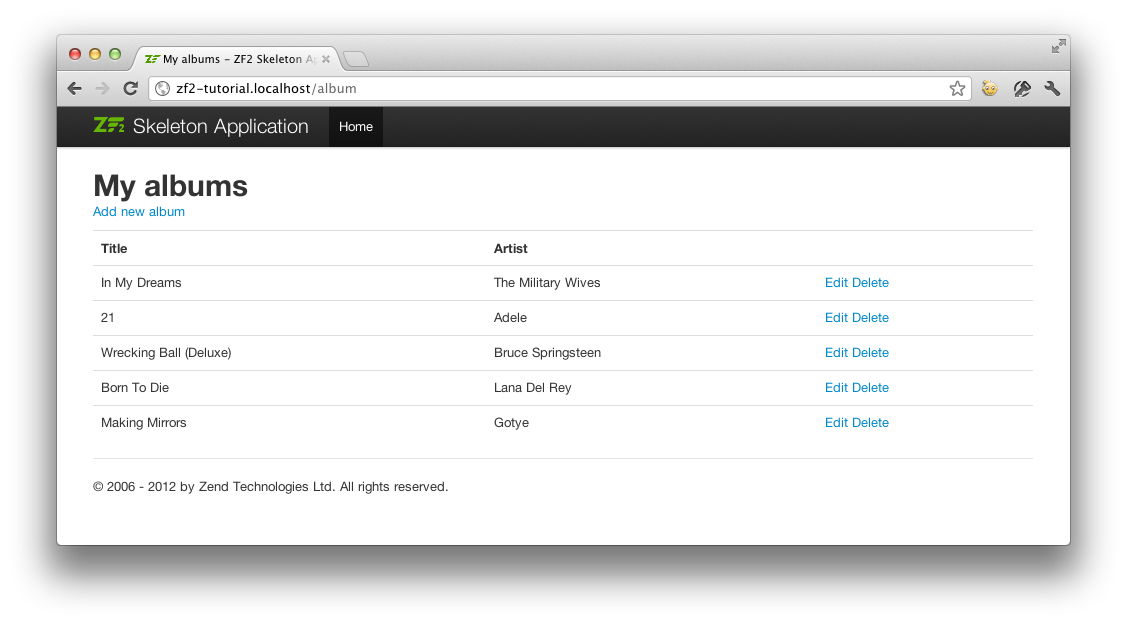
Listing albums
In order to list the albums, we need to retrieve them from the model and pass
them to the view. To do this, we fill in indexAction() within
AlbumController. Update the AlbumController’s indexAction() like
this:
module/Album/src/Album/Controller/AlbumController.php:
// ...
    public function indexAction()
    {
        return new ViewModel(array(
            'albums' => $this->getAlbumTable()->fetchAll(),
        ));
    }
// ...
With Zend Framework 2, in order to set variables in the view, we return a
ViewModel instance where the first parameter of the constructor is an array
from the action containing data we need. These are then automatically passed to
the view script. The ViewModel object also allows us to change the view
script that is used, but the default is to use {controller name}/{action
name}. We can now fill in the index.phtml view script:
<?php
// module/Album/view/album/album/index.phtml:
$title = 'My albums';
$this->headTitle($title);
?>
<h1><?php echo $this->escapeHtml($title); ?></h1>
<p><a href="<?php echo $this->url('album', array(
'action'=>'add'));?>">Add new album</a></p>
<table class="table">
<tr>
<th>Title</th>
<th>Artist</th>
<th> </th>
</tr>
<?php foreach($albums as $album) : ?>
<tr>
<td><?php echo $this->escapeHtml($album->title);?></td>
<td><?php echo $this->escapeHtml($album->artist);?></td> <td>
<a href="<?php echo $this->url('album',
array('action'=>'edit', 'id' => $album->id));?>">Edit</a>
<a href="<?php echo $this->url('album',
array('action'=>'delete', 'id' => $album->id));?>">Delete</a>
</td>
</tr>
<?php endforeach; ?>
</table>
The first thing we do is to set the title for the page (used in the layout) and
also set the title for the <head> section using the headTitle() view
helper which will display in the browser’s title bar. We then create a link to
add a new album.
The url() view helper is provided by Zend Framework 2 and is used to create
the links we need. The first parameter to url() is the route name we wish to use
for construction of the URL, and the the second parameter is an array of all the
variables to fit into the placeholders to use. In this case we use our ‘album’
route which is set up to accept two placeholder variables: action and id.
We iterate over the $albums that we assigned from the controller action. The
Zend Framework 2 view system automatically ensures that these variables are
extracted into the scope of the view script, so that we don’t have to worry
about prefixing them with $this-> as we used to have to do with Zend
Framework 1; however you can do so if you wish.
We then create a table to display each album’s title and artist, and provide
links to allow for editing and deleting the record. A standard foreach: loop
is used to iterate over the list of albums, and we use the alternate form using
a colon and endforeach; as it is easier to scan than to try and match up
braces. Again, the url() view helper is used to create the edit and delete
links.
Note
We always use the escapeHtml() view helper to help protect
ourselves from XSS vulnerabilities.
If you open http://zf2-tutorial.localhost/album you should see this: